
Many computer users must create bootable USB drives to install operating systems, run diagnostics, or perform system repairs. WinToFlash is a widely used tool that simplifies this process, allowing you to quickly transfer installation files from CDs, DVDs, or ISO images to USB drives. One common question is whether you must format your USB drive before using WinToFlash.
This guide will explore the necessity of formatting your USB drive before using WinToFlash. We will discuss the importance of formatting, when it is necessary, and how to do it correctly. Additionally, we will provide a step-by-step guide to using WinToFlash, address common issues, and offer best practices to ensure a smooth and successful experience. By the end of this comprehensive guide, you will have a clear understanding of the role formatting plays in the bootable USB creation process and how to maximize the effectiveness of WinToFlash for your computing needs.
Ease of Use
User-friendly interface that simplifies the process of creating bootable USB drives.
Intuitive Design: WinToFlash features a straightforward, easy-to-navigate interface that caters to beginners and advanced users. This reduces the learning curve and allows users to create bootable USB drives with minimal hassle.
Guided Steps: The software provides step-by-step guidance throughout the bootable USB creation process, making it simple for users to follow without confusion.
Minimal Technical Knowledge Required: Even those with limited technical expertise can use WinToFlash effectively, as the interface eliminates the need for complex commands or configurations.
Multi-Boot Support
Ability to create USB drives with multiple boot options.
Versatility: With multi-boot support, users can create a single USB drive that contains multiple operating systems or tools, such as Windows, Linux, and various system utilities. This is particularly useful for IT professionals and enthusiasts working in different environments.
Convenience: Having multiple boot options on one USB drive reduces the need to carry various drives for different purposes, streamlining the workflow and saving time.
Custom Boot Menu: WinToFlash allows users to set up a custom boot menu, enabling easy selection of the desired operating system or tool during boot-up.
Compatibility
Supports various operating systems, including Windows and different Linux distributions.
Extensive OS Support: WinToFlash is compatible with many versions of Windows, from older versions like Windows XP to the latest versions such as Windows 10 and 11. It also supports numerous Linux distributions, making it a versatile tool for different user needs.
Cross-Platform Use: The broad compatibility ensures that users can create bootable USB drives for different systems, whether for installation, recovery, or diagnostics.
Frequent Updates: WinToFlash developers regularly update the software to maintain compatibility with new operating systems and improvements in existing ones.
Customization
Offers options for customizing the bootable USB drives to meet specific needs.
Tailored Boot Options: Users can customize the boot settings to match their specific requirements, such as adjusting partition schemes, file systems, and boot parameters.
Add Custom Files: WinToFlash allows you to add custom files or applications to the bootable USB drive, making it a comprehensive tool for various tasks.
Personalized Boot Menus: The software provides options to create customized boot menus, making it easier to navigate and select the desired boot option during startup.
Advanced Settings: For power users, WinToFlash offers advanced settings that enable detailed configuration of the bootable USB drive, ensuring it meets precise technical specifications.
By providing these features, WinToFlash stands out as a robust and user-friendly tool for creating bootable USB drives, catering to a wide range of users and their specific needs.
Why Formatting is Important
Formatting a USB drive is crucial in preparing it to create a bootable drive with WinToFlash. Here are the key reasons why formatting is essential:
Ensuring Compatibility
Operating System Requirements: Different operating systems have specific requirements for the file system used on the USB drive. For instance, Windows often uses FAT32 or NTFS, while some Linux distributions may prefer ext4 or other file systems.
Bootable Files Compatibility: Ensuring the USB drive is formatted with the correct file system guarantees that the bootable files can be transferred and used without issues. This prevents compatibility problems that might arise during the boot process.
Universal Accessibility: A properly formatted USB drive ensures that it can be read by the target system, whether it is a Windows PC, a Linux machine, or another type of device.
Removing Existing Data
Eliminating File Conflicts: Formatting removes all existing data on the USB drive. This is crucial to prevent conflicts between existing files and the new bootable files you are copying.
Ensuring Sufficient Space: It clears up space on the USB drive, providing enough room for the new files. This is particularly important when dealing with large installation files or multiple operating systems.
Reducing Errors: Starting with a clean slate minimizes the likelihood of encountering errors related to residual data or partially overwritten files. This makes the bootable drive creation process smoother and more reliable.
Optimizing Performance
Efficient Data Writing: A freshly formatted USB drive can perform more efficiently. The formatting process can optimize the drive’sdrive’s structure, making data writing and reading faster.
Minimizing Errors: Formatting helps identify and mark bad sectors on the USB drive. This process avoids problematic areas, reducing the chances of errors when creating the bootable drive.
Ensuring Readiness: A formatted drive is clean and ready for use. This preparation step ensures that the drive can transfer and store bootable files without hitches.
In summary, formatting a USB drive before using WinToFlash is crucial for ensuring compatibility with the target operating system, removing existing data to avoid conflicts and errors, and optimizing the drive’s performance. Doing so sets the stage for the smooth and successful creation of a bootable USB drive, ready for installations, diagnostics, or repairs.
When to Format Your USB Drive
Formatting your USB drive is critical to ensure it is ready for creating a bootable drive. Here are the specific scenarios when formatting is necessary:
New USB Drives
When you purchase a new USB drive, it might come pre-formatted or with some preloaded content, such as promotional materials or software. Even if the drive is empty, it’sit’s generally recommended to format it before creating a bootable drive. Formatting a new USB drive ensures:
Proper Preparation: The drive is clean and prepared for the bootable files you will transfer.
Optimization: The drive is optimized for performance, reducing the risk of errors during the bootable drive creation process.
File System Compatibility: The new drive’s default file system may not suit your needs. Formatting allows you to choose the appropriate file system (e.g., FAT32, NTFS, exFAT) for the operating system you plan to install.
Previously Used USB Drives
Formatting is crucial if you are using a USB drive that has been used previously, especially one that contains essential data or has been used for other tasks. Here’sHere’s why:
Avoiding Conflicts: Previously used drives might contain data conflicting with the new bootable files. Formatting removes all existing data, ensuring there are no conflicts.
Clean Slate: Starting with a clean slate ensures that the bootable files are transferred correctly and without issues. It also helps avoid leftover data from previous uses that could interfere with the bootable drive creation process.
File System Errors: USB drives can develop file system errors or become fragmented over time. Formatting resolves these issues, ensuring the drive is in optimal condition for creating a bootable drive.
Changing File Systems
Different operating systems require specific file systems. For example, Windows installations typically use FAT32 or NTFS, while many Linux distributions prefer ext4 or other Linux-specific file systems. If your USB drive’s current file system is incompatible with the operating system you intend to install, you must format it. Here’sHere’s why:
Compatibility: A USB drive formatted with an incompatible file system may not boot correctly or could cause errors during the installation process. For instance, a USB drive with an NTFS file system may not work correctly when installing a Linux distribution.
File System Requirements: Each operating system has specific requirements for the file system to ensure proper functionality. Formatting the USB drive allows you to set the correct file system that aligns with the OS requirements.
Performance and Reliability: Using the appropriate file system for the intended operating system improves performance and reliability. It ensures that the drive operates smoothly and that the bootable media functions as expected.
In summary, formatting your USB drive is a vital step, whether it’sit’s new, previously used, or needs a different file system for compatibility with the operating system you plan to install. This practice helps ensure the drive is prepared correctly, free from conflicts, and optimized for creating a bootable USB drive.
How to Format Your USB Drive
Using Windows
Formatting a USB drive on a Windows computer is a straightforward process. Here’s a detailed step-by-step guide to help you through it:
Insert the USB Drive
Action: Plug your USB drive into one of the USB ports on your computer.
Why: The computer must recognize the USB drive before you can format it.
Open File Explorer
Action: Open File Explorer by clicking on its icon (usually a folder) in the taskbar or pressing Win + E on your keyboard.
Why: File Explorer is the interface that allows you to access and manage your drives and files.
Navigate to ”This PC” or ”My Computer”
Action: In the left-hand pane of File Explorer, click on ”This PC” or ”My Computer” (depending on your Windows version).
Why: This will show you all the drives connected to your computer, including your USB drive.
Right-click the USB Drive
Action: Find your USB drive in the list of drives and right-click on it to open the context menu.
Why: Right-clicking brings up a menu with various options you can perform on the USB drive.
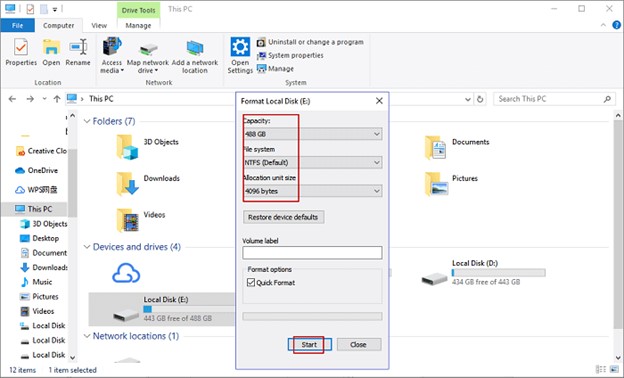
Select ”Format”
Action: Click on the ”Format” option from the context menu that appears.
Why: Selecting ”Format” will open the formatting dialog box where you can configure how the drive will be formatted.
Choose File System
Action: In the formatting dialog box, you will see an option labeled ”File system”. Click the dropdown menu and choose the appropriate file system for your needs. Common options include:
FAT32: Compatible with most devices but has a 4GB file size limit.
NTFS: Supports larger file sizes and is suitable for Windows systems.
exFAT: Combines the compatibility of FAT32 with the capability to handle large files.
Why: The file system determines how data is stored on the drive and what devices can read it.
Start Formatting
Action: After selecting the file system and other desired options (like setting a volume label), click the ”Start” button to begin formatting.
Why: Clicking ”Start” initiates the formatting, which will erase all data on the USB drive and set it up according to your selected options.
Step-by-Step Guide to Using WinToFlash
Downloading and Installing WinToFlash
Visit the Official Website: To download WinToFlash, visit the official WinToFlash website. This ensures you are getting the software from a trusted source.
Download the Installer: On the website, locate the download link for WinToFlash. Clicking on this link initiates the download of the installation file (installer) to your computer.
Run the Installer: Once the installer file is downloaded, locate it in your computer’s downloads folder or the location you chose for downloads. Double-click the installer file to run it. This action starts the installation process of WinToFlash on your computer.
Creating a Bootable USB Drive
Launch WinToFlash: After installing WinToFlash, you can find its shortcut on your desktop or in the Start menu. Double-click the shortcut to open the WinToFlash application.
Select Task: Within WinToFlash, you are prompted to select the type of task you want to perform. This typically involves choosing the bootable USB drive you wish to create (e.g., Windows setup, Linux distribution, etc.).
Insert USB Drive: Ensure your USB drive, which should be previously formatted and ready for use, is connected to your computer’s USB port.
Choose Source and Destination: In WinToFlash, specify the source of your installation files. This can be a CD/DVD from which you want to transfer files or an ISO image file stored on your computer. Also, select the destination USB drive where you wish WinToFlash to create the bootable drive.
Configure Settings: Adjust any settings in WinToFlash according to your preferences or specific requirements. This may include selecting the file system for the USB drive or adjusting partition settings if applicable.
Start the Process: Once all settings are configured, initiate the creation process by clicking on the ”Start” or ”Run” button within WinToFlash. This action begins transferring files from the source (CD/DVD or ISO) to the USB drive, making it bootable.
Complete the Process: Wait for WinToFlash to complete the creation process. This duration varies depending on the size of the installation files and the speed of your USB drive. Once finished, safely eject the USB drive from your computer.
User Reviews and Testimonials
Real-World Experiences
Users have praised WinToFlash for its ease of use and reliability. Here are some testimonials from satisfied users:
John D.: “WinToFlash made it incredibly easy to create a bootable USB drive for my Windows 10 installation. The process was straightforward, and I encountered no issues.”
Emily R.: “”As an IT professional, I rely on WinToFlash for creating recovery drives. It’s a versatile tool that has never let me down.”
Michael S.: “I used WinToFlash to create a multi-boot USB drive with Windows and Linux. The customization options are fantastic, and the process was seamless.”
Conclusion
Formatting your USB drive before using WinToFlash is a crucial step to ensure compatibility, remove existing data, and optimize performance. This comprehensive guide has provided detailed instructions on how to format your USB drive and use WinToFlash to create bootable USB drives. By following these best practices, you can ensure a smooth and successful experience, whether you’re you’re installing a new operating system, running diagnostics, or performing system repairs.